| Bot Development Kit (BDK) User's Guide |
The Bot Development Kit (BDK) is a set of tools to help participants develop solutions for the ICFP 2005 programming contest. The BDK is provided by the contest organizers, and it includes a game server, simple test bots, a GUI bot, and a bot visualizer.
See BDK Twist Update for information about tools for the twist phase. |
| Installation |
The BDK is available in several forms:
| Note: Under Windows, the bdk.plt archive does not work with version 299.100 DrScheme, because that version cannot create MrEd-based console applications. Use the binary-form bdk-win.zip, instead. |
| Documentation Conventions |
When writing examples in this user guide, we show command-line executions after a % prompt, like this:
% echo hello world!
The example command lines should run on all platforms. The % prompt is not part of the command line that you would type, of course.
The examples assume that all executables can be found by the shell through the PATH environment variable. In your own shell, add path prefixes as necessary.
The examples consistently omit .exe after executable names. The actual executables for Windows have an .exe suffix, but the suffix can be omitted when typing the command.
| BDK Tools |
The BDK provides the following executables:
| Running the Server |
If you run the server program with no command-line argument:
% server
then nothing much appears to happen for a while. By default, the server runs a game using no-op-robber, four instances of mcgruff, and one no-op-cop. Eventually, the server reports scores for the six players.
| Note: The default bots for server are all provided by the BDK along with server. The server program expects to find the bots in its own directory, as opposed to the current working directory, so you can safely run server with a full or relative path. |
If your robber bot is named myrobber, run a game using myrobber like this:
% server --robber myrobber
The --robber flag tells server to use the given command line as the robber bot (instead of no-op-robber). The given command is provided verbatim to a shell, so if myrobber takes an argument indicating how well it should play, and you want to pass it 11, then run the game as
% server --robber "myrobber 11"
To change one of the cops, use --copA, --copB, --copC, --copD, or --copE, which sets the first, second, third, fourth, or fifth cop, respectively. For example, the following command uses mycop for two of the cops in a game:
% server --robber "myrobber 11" --copB "mycop 7" --copC "mycop 0"
Alternately, you can use the short form of the flag names:
% server -r "myrobber 11" -b "mycop 7" -c "mycop 0"
For a complete list of the flags supported by the server, use the --help or -h flag:
% server --help
| Player Names |
Multiple players registered with the server might choose the same name. For example, server by default runs four instances of mcgruff that all claim the name "McGruffX". To avoid conflicts, and to avoid confusion with map locations, the server sometimes picks new names for the bots, and reports the new names back in the world-skeleton message.
Your bot should not rely on a particular renaming algorithm, but for the purposes of testing, server renames as follows:
Thus, multiple "McGruffX" players get renamed to "McGruff2", "McGruff3", etc.
| Action Validation Port |
When server is started with the --gui flag, it opens a TCP listener socket at port 9803. This port is used by the GUI player to validate actions, so that the GUI sends only legal actions through the game's normal protocol, and users get feedback about illegal actions.
If the server is unable to open the TCP listener, it reports a warning, but continues. Similarly, if the GUI cannot reach the server, it reports a warning and continues. To disable the GUI's attempt to validate moves, provide the --no-validate or -x flag to gui-cop, gui-robber, show-cop, or show-robber.
You can use the validation port for testing with your own bots, but it will not be available during tournament play.
To validate an action:
winner: myrobberfollowed by a newline.
| Running the Test Bots |
| no-op-robber |
The no-op-robber program is a simple robber bot that can be used while testing other bots.
Running the program directly with
% no-op-robber
produces the output
reg: NoOpRobber robber
and then the program waits for input. This is because bots communicate with the server through the standard input and output ports. When the server runs the program, it reads the above registration line, and then it sends the world-skeleton message to the program's input, and so on. While playing, the no-op-robber program always reports a move to the server that keeps the bot where it is.
As we noted in Running the Server, the no-op-robber program is the default robber player that server runs. The following command runs with the robber name "Carnegie", instead of the default name "NoOpRobber":
% server --robber "no-op-robber --name Carnegie"
If any other player chooses the name "Carnegie", the server will choose the actual name for the player as previously described in Player Names.
The no-op-robber builds each message to send as follows:
|
| no-op-cop |
The no-op-cop program is a simple cop bot that can be used while testing other bots.
As with no-op-robber, running no-op-cop directly
% no-op-cop
produces output and waits:
reg: NoOpCopX cop-car
The no-op-cop program accepts command-line flags to set the player's name and initial type. Run with the --help flag for more information, but here's one example:
% server --copE "no-op-cop --name Harry"
While playing, the no-op-cop program always reports a move to the server that keeps the bot where it is. When it smells a robber, it offers information about where the robber might be, and when it does not smell a robber, it offers information about where the robber cannot be. It offers no plans of its own, and when voting for plans, it echos the order given to it by the server.
The no-op-cop builds each message to send as follows:
|
| Note: The no-op-cop player shares part of the implementation of server, and it works properly only with the game map that is built into server. |
| mcgruff |
The mcgruff program is a another cop bot that can be used while testing. The program takes the same arguments as no-op-cop, but while playing, the mcgruff player pays attention to plans and does what it's told.
Specifically, the mcgruff program offers information like no-op-cop, offers no plans of its own, and votes against its own (empty) plan. Furthermore, it orders its votes against a plan from any cop whose name matches its own except for the last character. For the move action, mcgruff takes the move (if any) suggested for it by the winning plan (even if the move is invalid).
Explicitly supplying mcgruff to server is probably not useful (although it may be useful with show-cop, which is described later in Visualizing a Bot with the GUI). The server program uses mcgruff for the first four cops so that your bot, as the fifth cop, can easily control them by supplying plans. Note that changing the name of a mcgruff player would prevent other instances of mcgruff from recognizing it, so they might vote for its empty plan.
The mcgruff builds each message to send as follows:
|
| Note: The mcgruff player shares part of the implementation of server, and it works properly only with the game map that is built into server. |
| Running the GUI Bots |
The gui-robber and gui-cop programs are bots like no-op-robber and no-op-cop, but each program's actions are determined by a human using a graphical user interface (GUI).
The server program enforces timeouts that are too fast for GUI play. To run a GUI bot, supply the --gui flag to the server to disable timeouts:
% server --gui --robber gui-robber --copE gui-cop
| GUI Map |
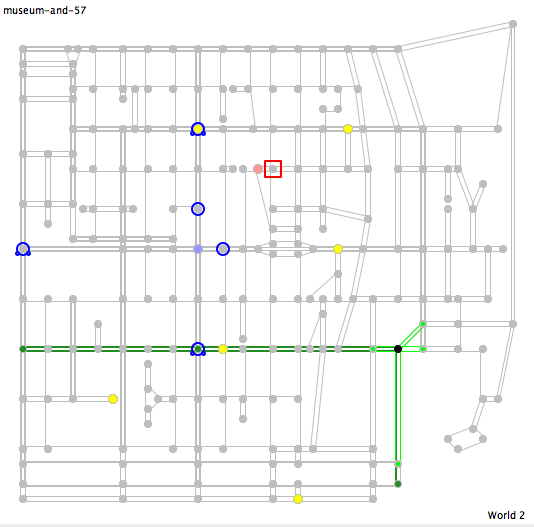
In a cop or robber GUI, the game map looks like this:
|
| Legend: | |||||||||||||||||||||||||||||||||||
| |||||||||||||||||||||||||||||||||||
| |||||||||||||||||||||||||||||||||||
| |||||||||||||||||||||||||||||||||||
| |||||||||||||||||||||||||||||||||||
| |||||||||||||||||||||||||||||||||||
| |||||||||||||||||||||||||||||||||||
To understand street direction, imagine driving on the right-hand side of the road. If there's an edge offset to the right from one node to another, then a street goes in that direction. If there's only an edge inset to the left from one node to another, then the road goes only in the other direction. For example, in the loop at the bottom-right corner of the map, cars must drive counter-clockwise.
Since there may be multiple informs about a single intersection, the GUI uses shades or blue, red, and gray to synthesize the overall sense of the informs about each node. The node is bluish (ie, cold) if the strong info is all negative, reddish (ie, hot) if the strong info is all positive, and shades of gray if the positive and negative are about equally strong. It's dim (white) if the overall info is weak, and bright (red/blue/black) if the overall info is strong. More precisely, the GUI computes two averages, the average of all of the negative values, and the average of all of the positive values. Then, it combines them into a single color with red, blue, and green components (between 0.0 and 1.0):
| Red | = | 1.0 - abs(negative-average)/100 |
| Green | = | 1.0 - max(abs(negative-average), positive-average)/100 |
| Blue | = | 1.0 - positive-average/100 |
When a node is selected, the top-left corner of the map shows the location name, and also lists any players known to be at the location. For a selected bank location, the top-left of the map also shows the amount of money in the bank.
In the above map, the robber is shown as a square, because this map was taken from a run of the robber GUI. In a cop GUI, one of the blue icons will be square (and the robber typically will not appear at all).
| Robber GUI |
The robber GUI program looks like this:
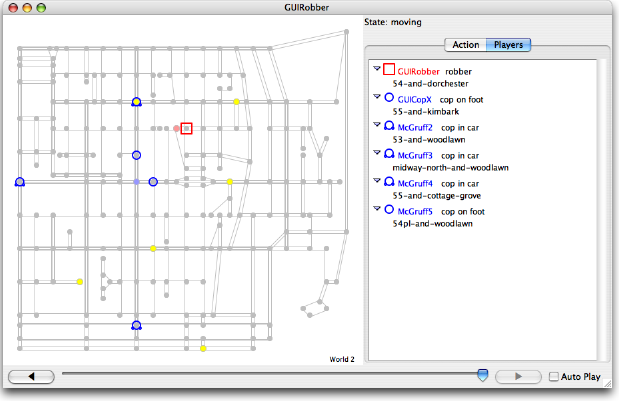 |
Beside the map, the GUI contains a panel for selecting whether to take an action or display player information. The GUI also contains a slider at the bottom for rewinding the GUI state to previous actions. (Previous actions are read-only.) Finally, the Auto Play check-box in the bottom right causes the GUI to automatically play default actions.
The screen shot above shows the GUI in Players mode, where information about each player is shown. Clicking on a particular player in the list causes the corresponding node in the map to become selected.
| Robber Moving Action |
To make a robber move, use the Action panel:
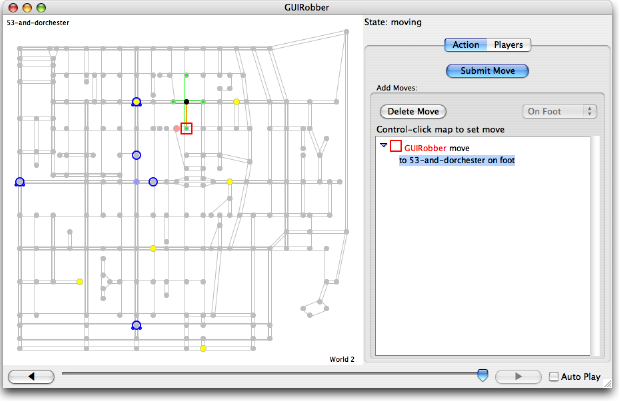 |
For consistency with various modes of the cop GUI, the Action panel for the robber contains a list of players, but the list always contains just the robber. Right-click (Mac OS: control-click) on the map to set the robber's destination for this turn, and the move is shown as an orange line on the map. Right-click works only when something is selected in the action list (and clicking the robber's icon in the map selects the robber in the list).
| Cop GUI |
The cop GUI is similar to the robber GUI, but it has more panels on the right:
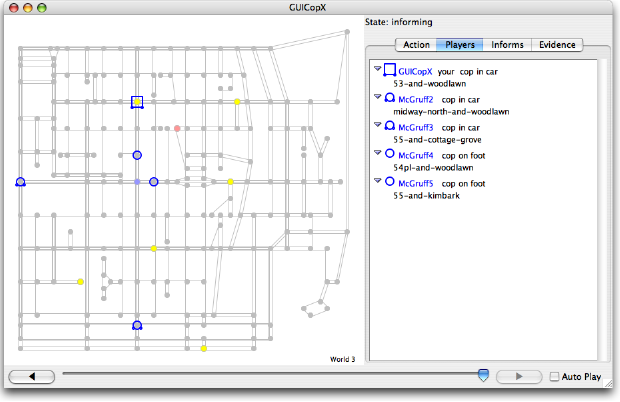 |
The robber shows up in the cop's list of players when it has just robbed a bank. Otherwise, only the locations of other cops are known.
After the Players panel, the cop GUI includes an Informs panel. This panel contains information during the planning state, as described below.
The cop GUI also provides an Evidence panel that shows the evidence and smells visible to the cop in the current world. This information is always drawn on the map using small red dots on relevant nodes.
The label above the right-hand panel shows the action state of the cop within a particular world. In the screen dump above, the cop is in the informing state. (See the problem spec for more information about the states.)
| Cop Informing Action |
The first action for a cop in a new world is to report information to other cops:
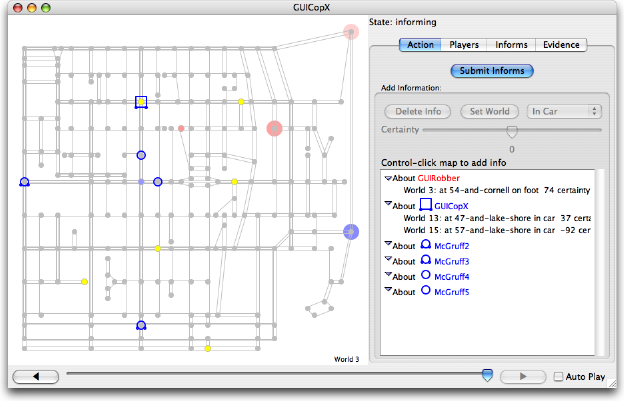 |
Adding information is similar to selecting a move, except that informs are shown as red (positive certainty) or blue (negative certainty) circles behind a node. To add information about a particular player, first click on the player (in the map or in the list) and then right-click on a map node. To set an information item's world number, travel mode, or certainty, select the item in the list and use the controls above the list, such as the Set World button.
When a particular player is selected in the list (or one if its information items is selected), inform circles for just that player are shown on the map. When nothing is selected in the list of information, all informs are drawn on the map. (To select nothing, click on empty space in the map.)
The robber shows up in the list of players for information, since a cop can speculate about where the robber is. The lack of a circle next to the robber's name indicates that the robber's actual location is not known to the cop, but the name is in red as a reminder that it's the robber's name.
When you have prepared all of the information that you want to share with other cops, click the Submit Informs button and the game continues.
| Cop Planning Action |
Information submitted by each cop is echoed back to all cops for the planning state. During this state, the Informs panel contains the information reported from all cops (including yours):
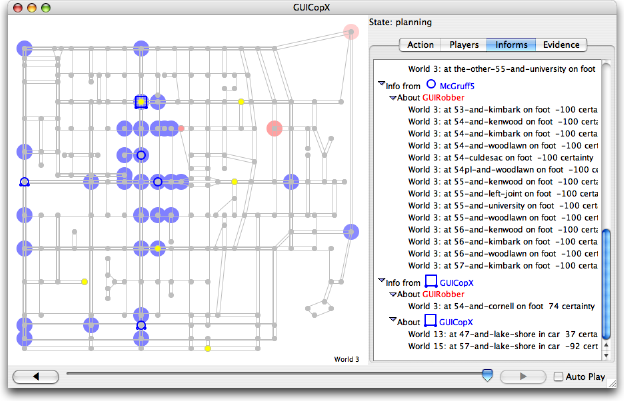 |
The Informs panel's information is drawn on the map in the same way as when information is being assembled in the informing state. Selecting an item in the list restricts the informs that are displayed in the map. Clicking on the map, in turn, causes an item to be selected in the list (and then the map's informs are restricted according to the selection).
To continue for the planning state, go back to the Action panel and build a plan for each cop. Building a plan is just like preparing informs, except that a plan has no certainty value, and the plan is shown with orange lines:
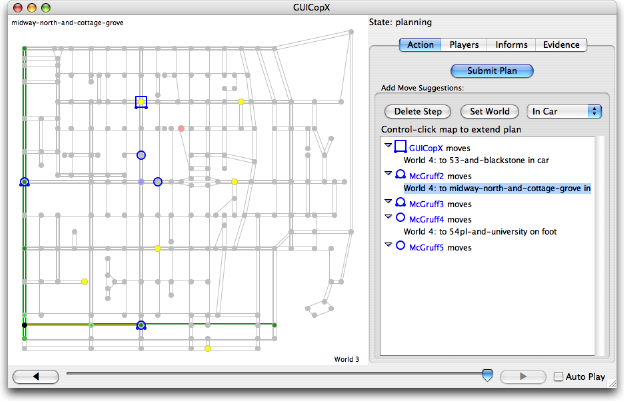 |
| Note: Showing a plan with a line is slightly misleading, because the plan steps do not necessarily correspond to a sequence of actions. It's a reasonable display for most plans, though. |
Planned moves are not checked for validity, because the game protocol does not require a valid sets of moves in a plan.
| Cop Voting Action |
Each plan submitted by a cop is reported back to all cops for the voting state. To continue in this state, order plans by moving a selected plan with the Vote Up and Vote Down buttons:
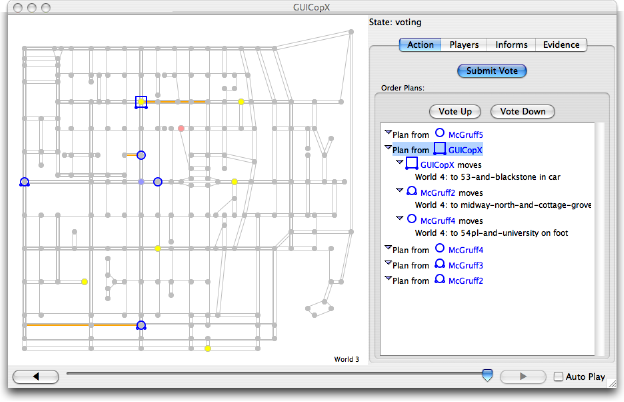 |
When you click the Submit Vote button, the order of the plans in the list is sent to the server.
| Cop Moving Action |
The moving action for a cop is similar to the robber moving action, except that the cop's move is initialized according to the winning vote, and the name of the cop whose plan was elected is shown above the move list:
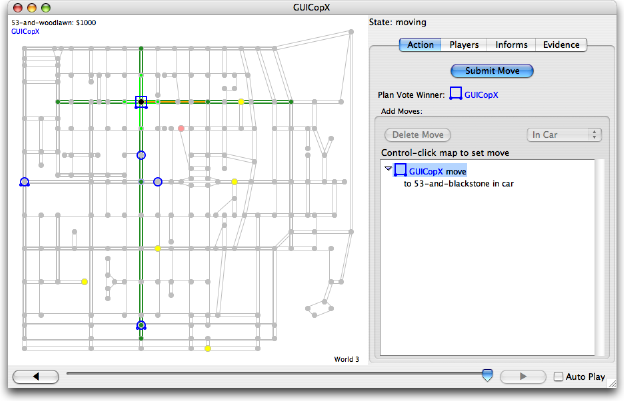 |
For details on the winning plan, rewind (using the slider at the bottom of the window) to see what the winning cop suggested.
| Visualizing a Bot with the GUI |
The show-cop and show-robber programs each take a bot to supply automatic moves, and they run gui-cop or gui-robber with --auto (described below) and redirected streams. As a result, the GUI is initialized for each action by the given bot. Furthermore, the Auto Play check-box starts checked, so that the GUI automatically imitates the given bot. The bot's actions are validated before they are used to initialize the GUI on each action.
For example, the following runs no-op-cop with a GUI view for the fifth cop in a game:
% server --gui --copE "show-cop no-op-cop"
The gui-cop and gui-robber programs accept any number of arguments, and the arguments are combined into a single command line. For example, the following runs no-op-robber with name "NoOpRobberGUI" with a GUI view:
% server --gui --robber "show-robber no-op-robber --name NoOpRobberGUI"
The GUI accepts and forwards the given player's move only as long as the Auto Play check-box is checked in the GUI. By unchecking the box, you can interrupt autoplay mode at any time, rewind to see past plays, and tweak any move that is provided by the bot.
The show-cop and show-robber programs are implemented by passing an --auto flag to gui-cop and gui-robber. The --auto flag causes the GUI bot to read bot messages that are interleaved with server messages on its input. It's practically always easier to use show-cop and show-robber than to use the --auto flag directly.
| Recording and Replaying Transcripts |
Use the standard program tee (or the provided alternate mtee) to capture the stream that is sent to a bot, or to capture the bot's responses. For example, the following records messages from the server to the GUI bot in cop.in, and it records messages from the GUI bot to the server in cop.out:
% server --gui --copE "tee cop.in | gui-cop | tee cop.out"
The cop.out transcript can be replayed verbatim as a bot, as long as all other players move the same way in the replayed game as when the transcript was recorded.
The BDK's replay program supports replay. It acts as a bot when given a script to replay. For example, the following replays using cop.out from above:
% server --copE "replay cop.out"
When the file passed to replay ends, the replay bot stops responding. To enable the bot to continue responding, replay accepts an optional command for a bot to run in parallel to the transcript; when the transcript is exhausted, the given bot takes over. For example, the following command continues playing as no-op-cop when cop.out runs out, allowing play to continue to the end of the game:
% server --copE "replay cop.out no-op-cop"
Combine replay with show-cop or show-robber to watch a replay:
% server --copE "show-cop replay cop.out no-op-cop"
| Change Log |


